
Post by summer201016 on Jul 14, 2013 23:29:34 GMT -5
Freaking out result inaccidently erased photos, sms or another vital stuff on your iPhone, iPad or iPod touch? iPhone is broken or damaged and today the data’s gone? Unsuccessful updates kill your data? These problems can be solved if you have owned a Wondershare Dr.Fone for iOS. Wondershare Dr.Fone for iOS is a superb tool for iOS devices users to recover data like photos & videos, contacts, SMS, call logs, memos plus more! It provides the two of you forms of recovery mode: to recuperate data right from the iOS device and to retrieve previous data by extracting it from iTunes backup! In this post, we're going to mainly display you tips on how to restore lost data straight from iOS devices.
Find Coupon Code for Wondershare Dr.Fone for iOS.
Part 1: Directly restore from iPhone 5/4S, iPad mini, iPad with Retina display, The new iPad, iPad 2 & iPod touch 5
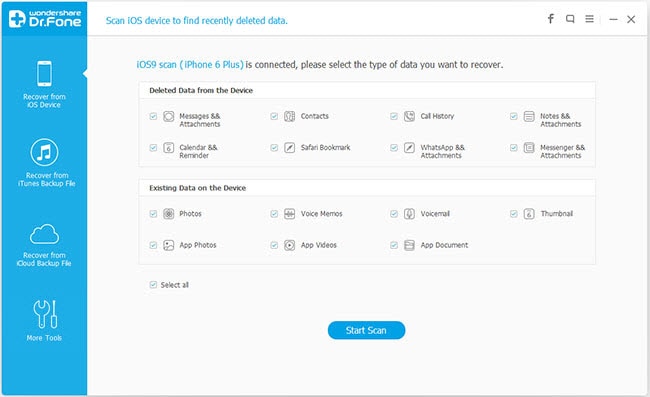
Step1. Connect your device to the computer
Run the program on your computer, and connect your device (eg. iPhone 5). Then you’ll understand the window below.
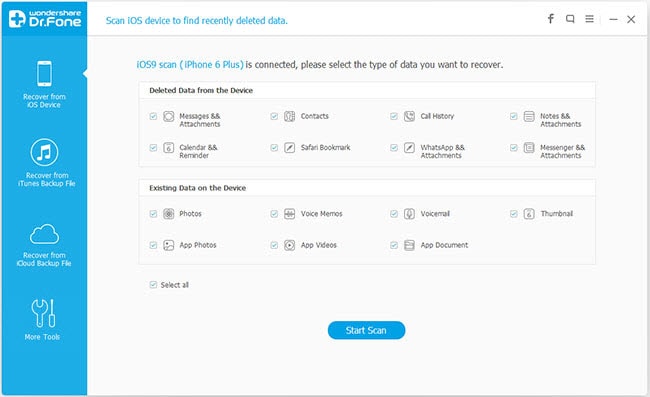
Step2. Begin to scan your device for deleted data on it
If your device is organized by the software, click “Start” to start out scanning it.
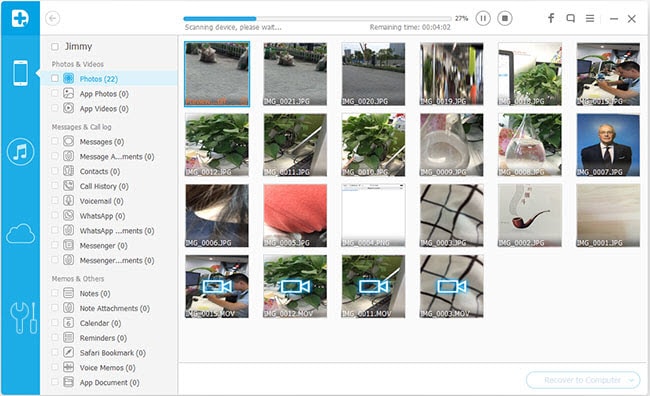
Step3. Preview and recover your data selectively
Soon after the scan, you may preview all data found on your device in the scan result. Click the categories on the left side of the window like camera roll, contacts, messages, etc. You'll be able to preview all of the specifics of them (with the exception of videos). Mark what you would like and click “Recover” to save them on your computer with single click.
Part 2: Restore Data Right from iPhone 4/3GS, iPad 1 & iPod touch 4
Step1. Link your device to the computer
Run the software on your laptop or computer, and connect your device (e.g. apple iphone 4). And then you’ll see the window listed below.
Step2. Download a plug-in to your device before scanning it
For these devices, you have to download a plug-in when you scan them. It’s very easy. You only need to press the “Download” option on the window, and will also demand 1-2 minutes.
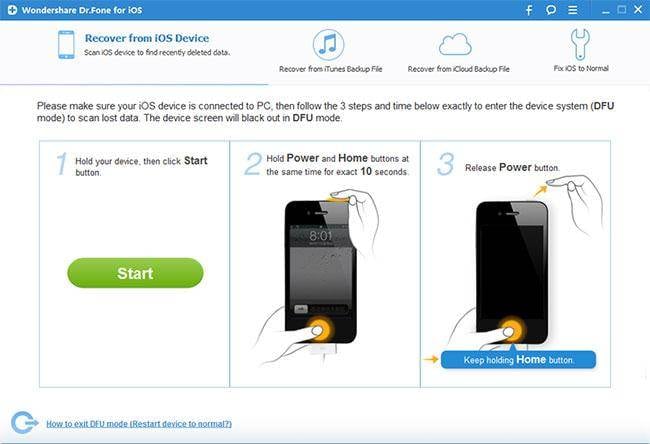
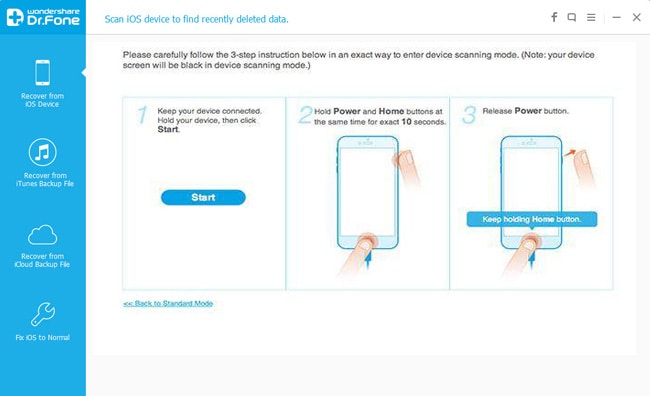
Step3. Enter the device’s scanning mode and scan it
Soon after downloading the plug-in, you can enter the device’s scanning mode now. Keep to the steps below.
1. Hold your device and just click “Start” on the window of the software.
2. Hold the"Power"and"Home"buttons on your device as well for simply 10 seconds.
3. When 10 seconds have passed, release the"Power"button right away, but preserve holding the"Home"button for another 15 seconds.
While you’re told that you’ve successfully entered the device’s scanning mode, Wondershaer Dr.Fone for iOS will automatically begin scanning your device for data on it the subsequent.
Step4. Preview and recover your data uniquely
Following the scan, you can preview all data located on your device in the scan result. Click on the categories on the left side of the window like camera roll, contacts, messages, and so forth. You may preview all of the details of them (except for videos). Mark what you would like and click “Recover” to save them on your computer with a single click.

Note: The data displayed in the scan result consists of deleted and existing items on your device. Both of them have their own color. If you want to separate them, you may use the button on the top:"Only display the deleted items.
Recommend you a free mkv converter.
Find Coupon Code for Wondershare Dr.Fone for iOS.
Part 1: Directly restore from iPhone 5/4S, iPad mini, iPad with Retina display, The new iPad, iPad 2 & iPod touch 5
Step1. Connect your device to the computer
Run the program on your computer, and connect your device (eg. iPhone 5). Then you’ll understand the window below.
Step2. Begin to scan your device for deleted data on it
If your device is organized by the software, click “Start” to start out scanning it.
Step3. Preview and recover your data selectively
Soon after the scan, you may preview all data found on your device in the scan result. Click the categories on the left side of the window like camera roll, contacts, messages, etc. You'll be able to preview all of the specifics of them (with the exception of videos). Mark what you would like and click “Recover” to save them on your computer with single click.
Part 2: Restore Data Right from iPhone 4/3GS, iPad 1 & iPod touch 4
Step1. Link your device to the computer
Run the software on your laptop or computer, and connect your device (e.g. apple iphone 4). And then you’ll see the window listed below.
Step2. Download a plug-in to your device before scanning it
For these devices, you have to download a plug-in when you scan them. It’s very easy. You only need to press the “Download” option on the window, and will also demand 1-2 minutes.
Step3. Enter the device’s scanning mode and scan it
Soon after downloading the plug-in, you can enter the device’s scanning mode now. Keep to the steps below.
1. Hold your device and just click “Start” on the window of the software.
2. Hold the"Power"and"Home"buttons on your device as well for simply 10 seconds.
3. When 10 seconds have passed, release the"Power"button right away, but preserve holding the"Home"button for another 15 seconds.
While you’re told that you’ve successfully entered the device’s scanning mode, Wondershaer Dr.Fone for iOS will automatically begin scanning your device for data on it the subsequent.
Step4. Preview and recover your data uniquely
Following the scan, you can preview all data located on your device in the scan result. Click on the categories on the left side of the window like camera roll, contacts, messages, and so forth. You may preview all of the details of them (except for videos). Mark what you would like and click “Recover” to save them on your computer with a single click.
Note: The data displayed in the scan result consists of deleted and existing items on your device. Both of them have their own color. If you want to separate them, you may use the button on the top:"Only display the deleted items.
Recommend you a free mkv converter.